Building your own Agentic Skill

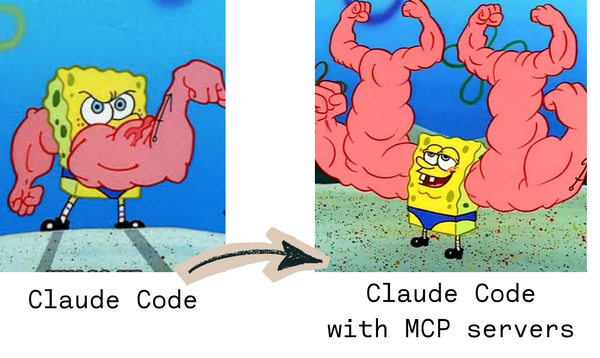
In one of my previous posts, I covered what an MCP server is. Now I’ll explore another option for improving your interaction with LLMs & agents - more specifically, we’ll look into Skills.
There’s no better way of understanding something than by building it yourself. So in this article, we will use all of our knowledge from the previous two articles on screenshot testing, and we’ll try to create our own skill to be used by others.
What is a skill?
As previously An MCP server is a “tool” that your agent can use, while a “skill” is a modular instruction with samples to give your LLM of choice a better understanding of certain tasks you want it to perform.
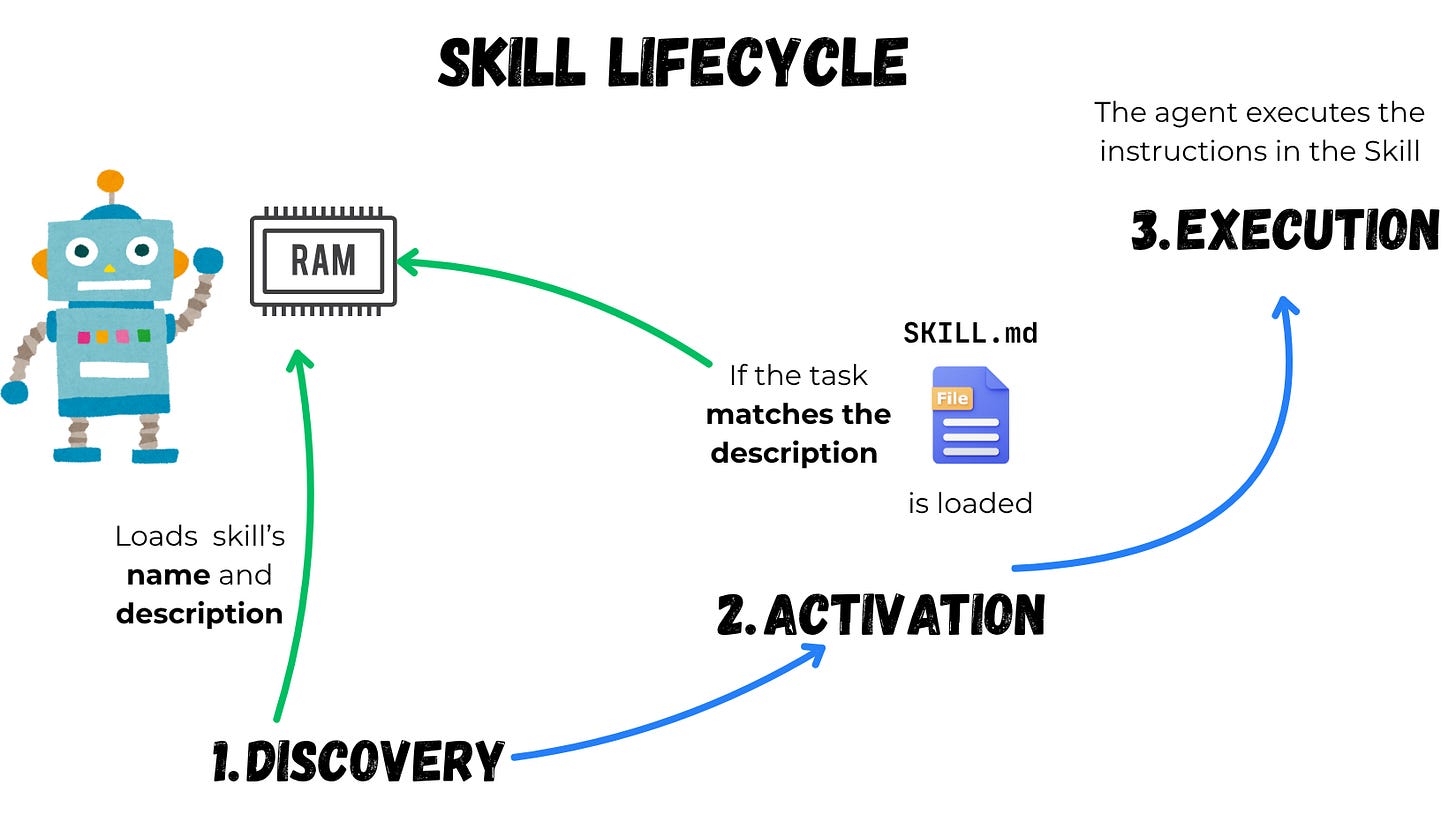
Agents load skills in steps:
- Discovery: Initially, an agent loads only the description and the name of the skill. All it needs to know at this point is what the skill does and when to trigger it.
- Activation: Once the agent comes across a task that can be a potential match for a skill, it reads the full
SKILL.mdfile and puts it into context. - Execution: The agent proceeds with the instructions described in
SKILL.md. If necessary, the agent may choose to execute the bundled code and use files in the referenced directories.
Full instructions load only when a task matches the description, so agents can be aware of dozens or hundreds of skills, whilst using only a small fraction of context.
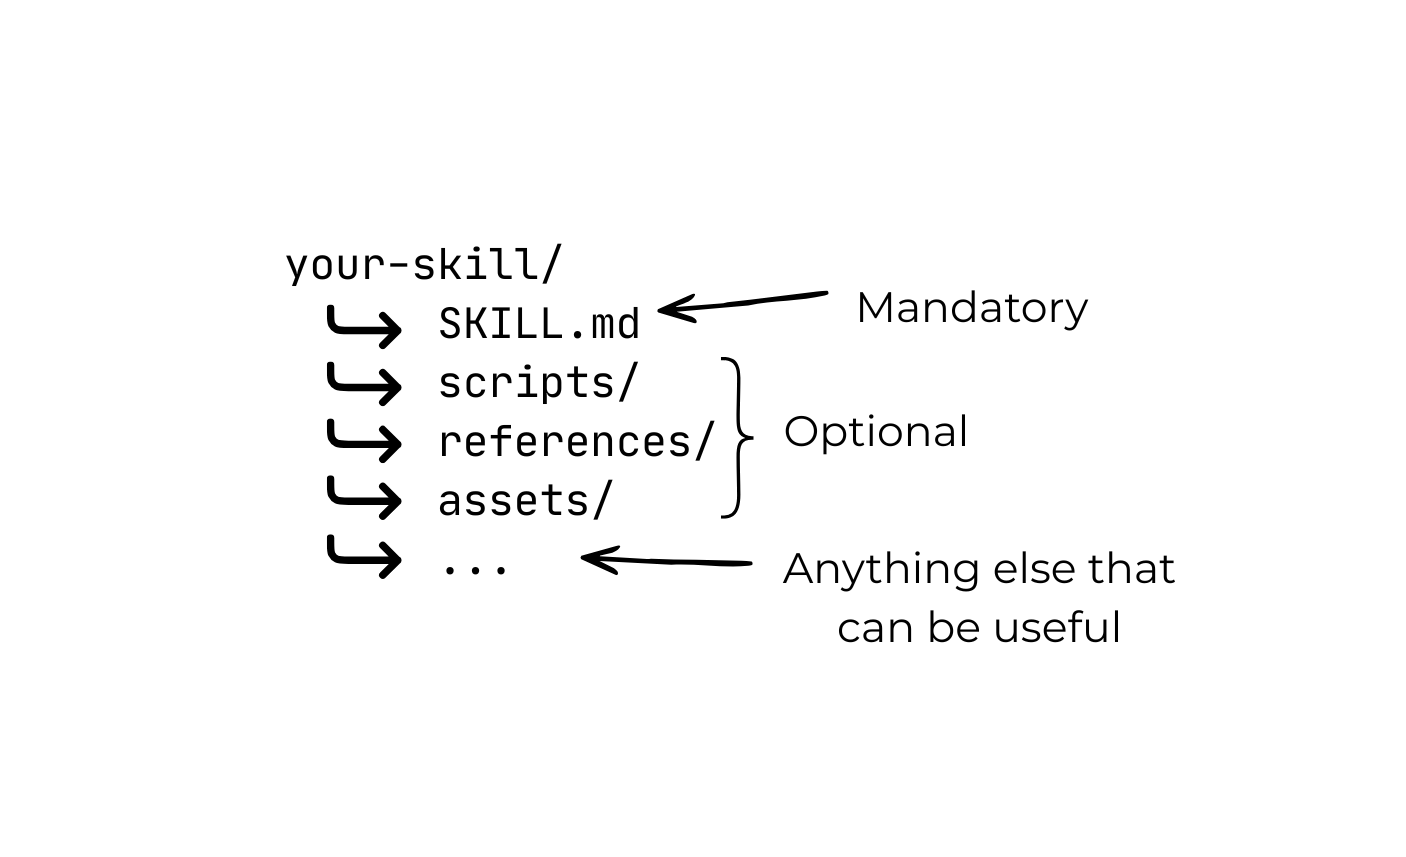
What’s inside
A “skill” is just what’s contained in the SKILL.md file. As per the standard, the only mandatory fields are the name and the description. After that, you should have the actual implementation of the skill - this can be anything from code samples to instructions to a truth table, etc.
Best practices for designing a Skill
There are dozens of best practices for creating a skill. But the most important one is providing as many useful details as possible without polluting the context . It can be tempting to put all of the knowledge of humankind into a SKILL.md , but remember that your LLM has limited context. And once activated, the LLM will load the whole SKILL.md file. According to this page by OpenAI:
1 token ~ 4 chars
If your skill is massive - say 100k chars, that equates to ~25k tokens. This means you have used up 1/8th of your context window (considering it’s 200k). And if the agent loads multiple skills for a specific task, it’ll have even less for your codebase. So I think you can see where this is going. You have to be frugal with what you put in your SKILL.md .
Here’s some nice advice from the official skill documentation:
Read agent execution traces, not just final outputs. If the agent wastes time on unproductive steps, common causes include instructions that are too vague (the agent tries several approaches before finding one that works), instructions that don’t apply to the current task (the agent follows them anyway), or too many options presented without a clear default.
Skills work best when they’re specific and modular. I was thinking of making a skill for screenshot testing as a whole, but such a skill might be too broad. That’s why we’ll solve a super-specific problem like integrating screenshot testing into Github Actions with Paparazzi. I already covered this in my previous article. So it makes sense to put this knowledge inside a skill.

Building the skill
Ok, let’s get our hands dirty with building the skill. The name and the description are the only mandatory parts of the declaration. But we’ll also add some metadata.
name: paparazzi-github-actions
description: Integrates screenshot testing with Paparazzi in Github Actions
metadata:
	author: Mykola Miroshnychenko
	keywords:
	  - Screenshot testing
	  - CI
	  - Continuous integration
	  - Paparazzi
	  - Github
	  - Github Actions
Adding prerequisites
Before we start putting the execution instruction, code snippets, references, etc., it’s best to let the agent know what needs to be in place before we proceed.
## Prerequisites

Make sure that Paparazzi Gradle plugin is installed. The latest version can be checked here - <https://cashapp.github.io/paparazzi/changelog/>
Git LFS needs to be installed. Ask the user for permission to install it if it's not installed. URL - <https://git-lfs.com/>  Command - brew install git-lfs
The project needs to have Paparazzi tests in place before proceeding.
Steps
This is the part that contains the actual execution algorithm. I like the step-by-step approach. It gives the agent a clear path to follow instead of grasping at straws. It’s also easier to structure your own thoughts like that as well.
Step 1
A Yaml file with the current Github Actions workflow should
be in  `./github/workflows`. If it's not there - create these directories and
inside create a `github-actions.yml` file. In such case, use
[this reference](references/basic-github-actions-workflow.md) for a standard workflow to put inside this file.
Notice that I’m referencing the skill folder structure here - specifically the references directory.
Since we don’t want to waste our tokens, it’s best not to overload our agent with unnecessary information. The structure for a basic GitHub Actions workflow .yml file should only be read by the agent in case there is no CI workflow at all. Therefore, we don’t put the whole workflow inside SKILL.md itself, but instead into the references directory for the agent to access if needed. This saves valuable context window and tokens.
Another reason for extracting code into different directories is that the LLM might already know what to do - so your solution might be redundant. However, if you absolutely want to guarantee that the agent uses your solution - then make sure the wording is explicit, like “Use”, “Read”, “Extract”, etc.
Step 2
If the user has has an existing workflow file in `./github/workflows` - amend the

	checkout Repo step (actions/checkout@v4) by adding `lfs:true` at the end like so:

      - name: Checkout Repo
        uses: actions/checkout@v4
        with:
          lfs: true
Steps 3, 4, 5, 6…
I’m not going to bore you with the whole sequence of events - you get the idea. In general, this whole skill is based on my previous article . You can check out the full SKILL.md file here .
This is what the structure of our skill looks like so far.
paparazzi-github-actions/
├── SKILL.md  # Our actual instructions
├── references/workflow.yml #separate "standard" github actions workflow

A skill to test our skill
Just like with your everyday coding, you can have a standardized way of testing your skill. You can do this with a JSON file called evals.json . However, testing a skill is different from testing code because you will have to check the output yourself. So, this is more akin to “fine-tuning” rather than testing.
Below is the eval.json which consist of:
- Prompt: Something a real user might type which would trigger your skill
- Expected output: This is the part that needs to be verified by a human. Essentially, this is the “ideal” scenario that has to be checked.
- Input files: An optional argument that contains a path to assets that might be used during the test.
We’ll start with two main scenarios as of now.
{
  "skill_name": "paparazzi-github-actions",
  "evals": [
    {
      "id": 1,
      "prompt": "I want my paparazzi screenshot tests to run on github actions. The repo already has the tests and the generated snapshots committed, but nothiing is yet done on CI",
      "expected_output": "Verifies the prerequisites first: the Paparazzi Gradle plugin is applied, Git LFS is available, and the paparazzi.snapshot { } tests each have a matching PNG under app/src/test/snapshots/images. Since there is no .github/workflows/ directory, creates .github/workflows/screenshot-tests.yml containing a checkout step with lfs: true, JDK + Gradle setup, a verifyPaparazzi<Variant> Gradle step, and an upload-artifact step that runs only on failure. Initializes LFS (git lfs install), tracks **/snapshots/**/*.png and commits .gitattributes, then — because the PNGs are already committed to history — moves them into LFS with git lfs migrate import and warns that this rewrites history and will need a force-push. Confirms tracking with git lfs ls-files.",
    },
    {
      "id": 2,
      "prompt": "My repo already has a CI workflow at .github/workflows/android.yml that builds the app and runs unit tests. I want to add Paparazzi screenshot verification to it. Do not replace my existing workflow.",
      "expected_output": "Does NOT overwrite or recreate the existing workflow file. Edits android.yml in place: adds lfs: true to the actions/checkout@v4 step in the relevant job, and ensures a verifyPaparazzi<Variant> Gradle step plus a failure-only upload-artifact step exist (adding them if missing), adjusted to the repo's module and build variant. Then performs the Git LFS setup (git lfs install, track the snapshots glob, migrate the already-committed PNGs into LFS) and verifies with git lfs ls-files.",
    }
}
We’ll put our evals.json into a separate directory so our structure will look like this:
paparazzi-github-actions/
├── SKILL.md
└── references/
    └── workflow.yml
└── evals/
    └── evals.json
Now you can either “manually” run these prompts, or you can use an “orchestrator” skill. By “orchestration” I simply mean another set of instructions i.e. a “skill-creator” skill. This skill was developed by Anthropic with the specific intent of creating and improving new skills. It’s an incredibly thorough set of instructions - so we will cover only the basics here.
Here’s the prompt that I’m using to orchestrate the testing of my skill:
I want you to use skill-creator skill and run the evals in the paparazzi-github-actions/evals within the current project
Once the orchestrator finishes the evaluation, you’ll get a *skill*-workspace directory alongside your skill one - in my case, it’s the paparazzi-github-actions-workspace .
Depending on how many times you’ve run/improved your skill, you might get several iteration directories. In my case, I ran it only once, so I only have one. Inside, you’ll find a bunch of files providing you insight into the performance of your skill:
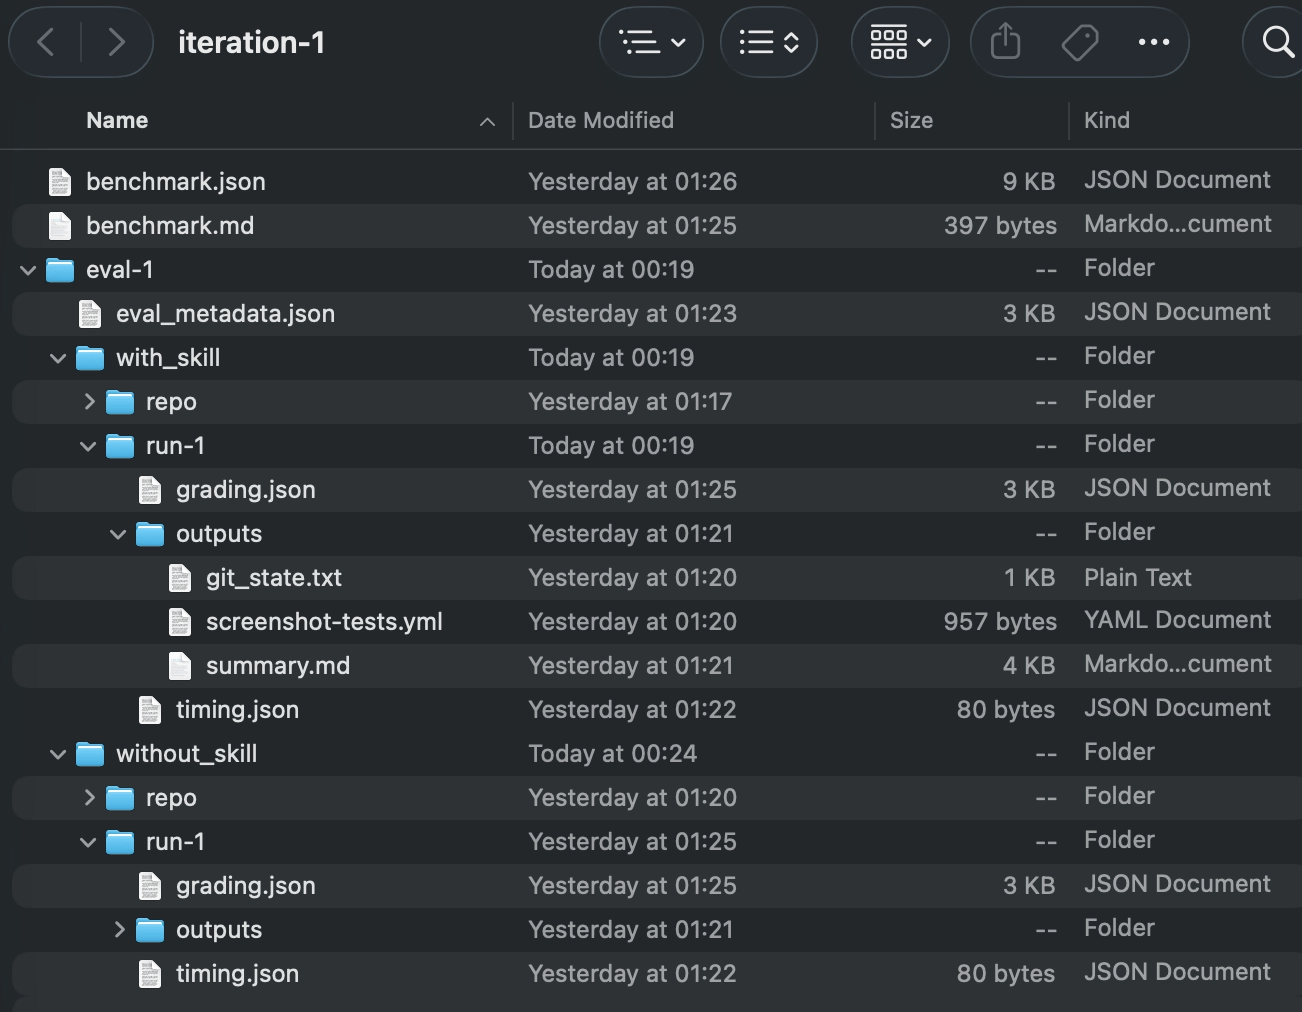
But the most interesting is the benchmark.md:
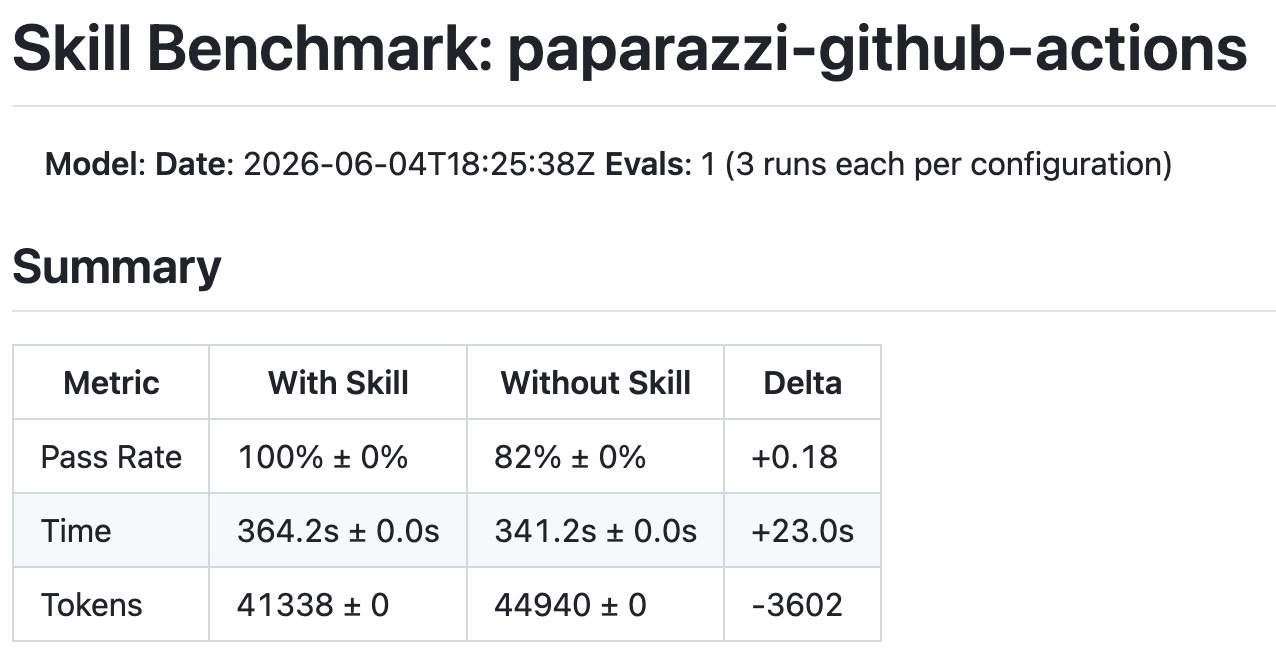
And the most important point is the Delta . So in my case, apparently, the success rate “With Skill” is 100% - which is reassuring. Yet in terms of the token usage and the time passed - it’s not that great. But, this is the first iteration - which means there’s a ton of room for improvement.
Now, skill optimization is another story, and it deserves an article of its own. I’ll leave you some resources that you can look into in case you’re interested.
Conclusion
While creating your skill is definitely an interesting thing to try, I feel like it’s a bit too “vague” in terms of building the actual skill and optimizing it. While writing this article, I’ve looked inside skills that were built by different companies, and it looks like there’s no single coherent standard. It seems you can put anything inside the instructions, and the way it’s actually tested is at the mercy of the “skill-creator” skill. Iterational improvement of skills is also very costly - a single iteration of paparazzi-github-actions skill took > 40k tokens. This is considering it’s tiny compared to other skills. So multiple improvement iterations might be in the millions of tokens.
What are your thoughts on this? Have you found a good way of building skills for LLMS? Leave your thoughts below.